
According to its official documentation,
The Pi-hole® is a DNS sinkhole that protects your devices from unwanted content, without installing any client-side software.
Pi-hole is a great piece of software if you are interested in a bit more privacy and saving some bandwidth at the same time.
As its name suggests, it can obviously be installed on a Raspberry Pi, but apart from that it actually runs on other Linux hardware as well. As long as your device can run one of the Officially supported Operating Systems, you should be able to run Pi-hole on it.
While supporting other hardware definitely has its use cases, I consider Raspberry Pi to be the best choice for running Pi-hole in the home network, because of its low cost and very low power consumption.
I happen to have a Raspberry Pi Zero that’s been collecting dust since I bought it a few years ago, which is perfect for running Pi-hole.
Install OS on Raspberry Pi
Obviously we need to install an operating system on Raspberry Pi before we could do anything with it.
The recommended way of installing an operating system for Raspberry Pi is to use the Raspberry Pi Imager. You’ll need a computer with an micro SD card reader to install an OS image on your card.
I’m running it on macOS, but it supports Linux and Windows as well. Just make sure to download the correct version for your OS.
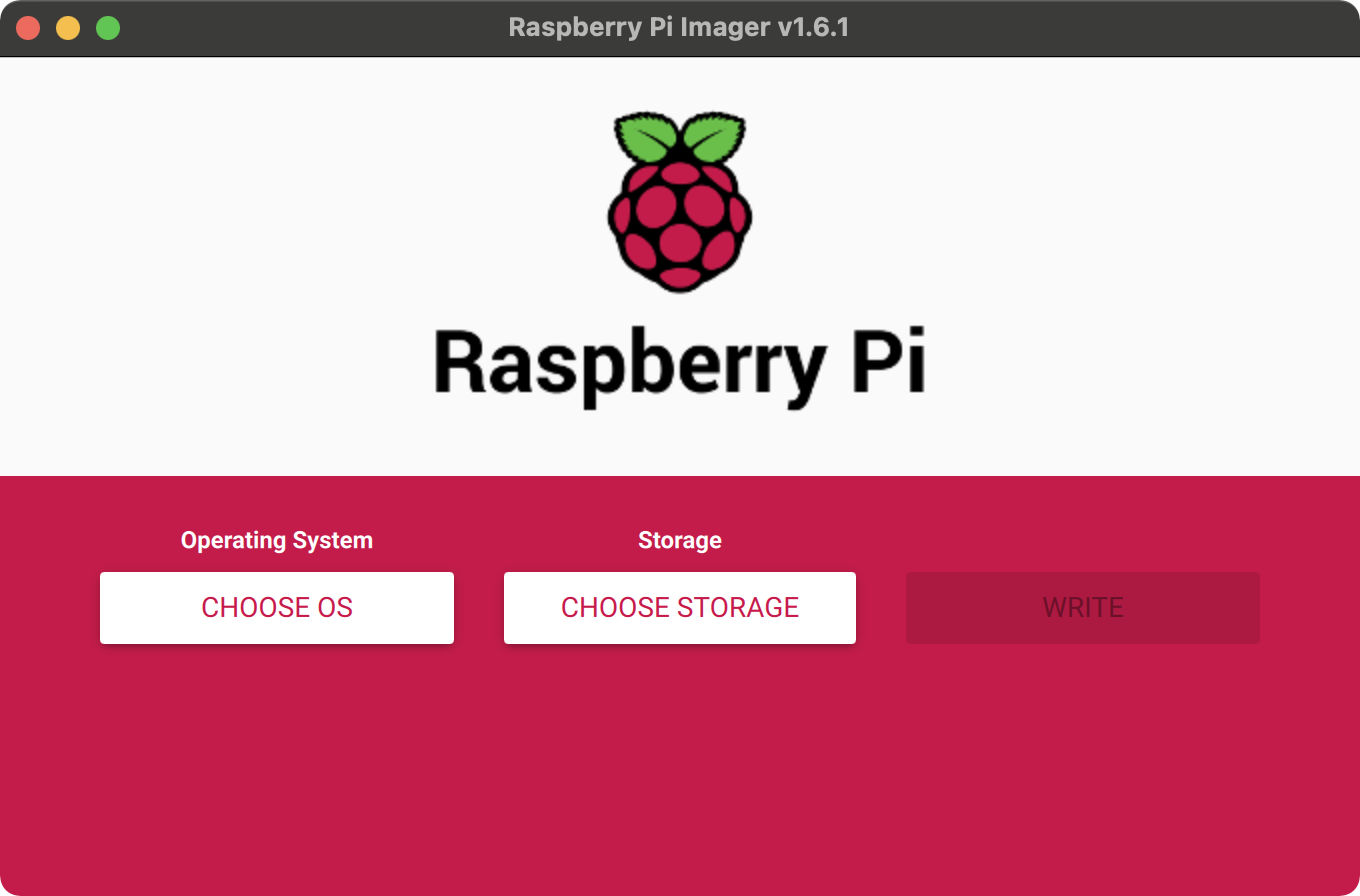
Click CHOOSE OS to choose from a list of options. I’d recommended just go with Raspberry Pi OS (32-bit), which is the first option, unless you have a specific purpose for the Pi and you know what you are doing.
Then click CHOOSE STORAGE to select the mounted micro SD card. Remember that the imager will erase the card first, so you’ll lost everything on the card. Make sure you’ve got backup for anything you still need on the card.
Lastly, click WRITE to install the selected OS on your card.
For most of the OS options, the imager will download the OS image while writing it to the micro SD card. If you have a slow Internet connect, you can also download the OS image separately from the Raspberry Pi OS download page and then choose Use custom for the OS option and select the downloaded .img file.
Advanced options for the imager
There is also an “Advanced” menu in the imager, which you can open with Ctrl-Shift-X. This menu allows you to perform tasks like enabling SSH and setting admin password. As described in the next section, we can do those with terminal commands too.
Setup Raspberry Pi
Since I find connecting a monitor, a keyboard and a mouse to the Raspberry Pi quite cumbersome, I’d like to setup a headless Raspberry Pi.
In order to achieve that, there are a couple more things to do before booting the Raspberry Pi: enable SSH access and allow auto WiFi connection.
Enable SSH access
On macOS, the SD card with Raspberry Pi OS image is usually mounted on /Volumes/boot.
We can enable SSH by creating an empty file named ssh in the root directory of the card:
cd /Volumes/boot
touch ssh
Auto WiFi connection
I’d also like the Pi to be able to connect to WiFi when it boots up.
In order to do that, create a text file named wpa_supplicant.conf with the following content:
country=<your-country-code>
ctrl_interface=DIR=/var/run/wpa_supplicant GROUP=netdev
network={
    ssid="<your-wifi-ssid>"
    psk="<your-wifi-psk"
    key_mgmt=WPA-PSK
}
Obviously, fill in the ISO 3166 alpha-2 country code of your country, your WiFi SSID and PSK.
Then copy the file to the root directory of the SD card:
cp wpa_supplicant.conf /Volumes/boot
Note: if you are using an older Raspberry Pi (like my Pi Zero), it might not support 5GHz networks
Connect via SSH
After the two steps above, we can put the SD card in the Raspberry Pi and boot it up.
Once it’s up and running, we should be able to connect to it via SSH:
ssh pi@<ip_for_raspberry_pi>
The default password is raspberry.
Make sure to update the admin password with passed after logging in.
Fix locale
When you run commands on the Raspberry Pi, you may see warnings like this
-bash: warning: setlocale: LC_ALL: cannot change locale (en_US.UTF-8)
So you might want to fix the locale.
If you are comfortable with vi or nano, just edit /etc/locale.gen and uncomment the line starting with en_US.UTF-8.
Otherwise you can run the following command to do the same:
perl -pi -e 's/# en_US.UTF-8 UTF-8/en_US.UTF-8 UTF-8/g' /etc/locale.gen
Then run the following:
locale-gen en_US.UTF-8
update-locale en_US.UTF-8
After that, the annoying warnings should be gone.
Check out Jared Wolff’s post for more details on locale.
Install Pi-hole
Now the Raspberry Pi is in a reasonable state, we are ready to install Pi-hole.
The most convenient way to is to use the following command:
curl -sSL https://install.pi-hole.net | bash
The installation process is relatively straightforward. Just follow the prompts to get it done.
If you’d like to know what the installation script actually does, check out the source code basic-install.sh.
Take advantage of Pi-hole in the network
After Pi-hole is successfully installed, we still need to configure the router to use Pi-hole as the DNS server, which makes sure that all devices on the network will be protected automatically by Pi-hole.
If that’s not supported by your router or you only want certain devices to use Pi-hole, you can configure the DNS server on each device.
You might want to check out this comprehensive guide on the different options to configure Pi-hole as your DNS server.
Manage blocklists
Pi-hole comes with a default blocklist:
https://raw.githubusercontent.com/StevenBlack/hosts/master/hosts
Which is well maintained and provides good protection without breaking normal functionality in most cases. For many this might be enough, but if you have other requirements, such as blocking adult content or targeted ads, you can add custom blocklists for improved blocking capabilities.
Check out The Best PiHole Blocklists (2021) for some blocklist options and more importantly, what to think about when choosing a blocklist.
You can add/remove blocklists under Group Management -> Adlists in the Pi-hole admin interface. After making changes there, you’ll need to either run pihole -g in terminal or go to Tools -> Update Gravity and click the Update button.
Whitelist Youtube history and etc
With the default blocklist from Pi-hole, the only thing that no longer works for me is Youtube history on iOS devices.
Adding a domain to the whitelist would solve that:
pihole -w s.youtube.com
Or if you prefer the admin interface, you can add a domain in Whitelist.
If you find other sites or services not working properly after introducing Pi-hole, you might want to check out the Commonly Whitelisted Domains and potentially whitelist relevant domains.
Keep software up-to-date
Last but not least, keeping things up-to-date on the Raspberry Pi would be a good idea.
Since Raspberry Pi OS is based on Debian Linux, we can use apt for that:
sudo apt update
sudo apt full-upgrade
Also we can remove packages that are no longer required with:
sudo apt autoremove
Summary
In this post, I walked through how to install Raspberry Pi OS, setup headless Raspberry Pi, install Pi-hole, manage blocklists and etc.
As many of my other posts, the main purpose is to serve as a reference for my future self. But if someone else finds it helpful too, I’d be very glad ![]()


Leave a comment